HOWTO: Update Ultra 20 BIOS From a USB Stick
Updating the firmware on an Ultra 20 is a really simple matter: download the "Tools and Drivers" ISO image, burn it to DVD (as it's about 1.3GB), boot from the DVD and select option 2 to perform the update.
However, it very quickly becomes way more complicated if you don't have a DVD burner or spare DVD-R, or even a DVD drive. So what other option do you have? Boot CD? Yes, but its way too complicated for the time and effort. Boot Network? Ditto. Boot USB? Bingo!!!
The "Tools and Drivers" ISO image comes in at about 1.3GB because it includes things like network and graphics drivers for Solaris, Linux and Windows, diagnostic tools and loads of other stuff we really don't need in order to perform the BIOS update. In fact, all we need is one 79Mb file - the boot.img file. This is a simple Linux boot.img file so we can create the bootable USB stick as you would on Linux, but from a Solaris/OpenSolaris system...
- Mount the ISO image:
$ pfexec mount -F hsfs /var/tmp/tools_and_drivers.iso /mnt
$If your version of Solaris/OpenSolaris doesn't have lofs support in
mount(1M)(I can't remember what rev this was introduced in), you will need to perform the following steps:$ pfexec lofiadm -d /var/tmp/tools_and_drivers.iso
/dev/lofi/1
$ pfexec mount -F hsfs /dev/lofi/1 /mnt
$ - Insert your USB stick and determine the device path. There are various methods to do this, but the easiest is to allow the USB device to be automatically mounted and then use
mount(1M)to determine the device path, and thenumount(1M)the USB device:$ mount | grep media
/media/MS1GB on /dev/dsk/c6t0d0p0:1 read/write/nosetuid/nodevices/hidden/nofoldcase/clamptime/noatime/timezone=0/dev=c810d0 on Sun Apr 19 11:33:11 2009
$ pfexec umount /media/MS1GB
$ - Overwrite your USB stick with the
boot.img:$ pfexec cat /mnt/boot.img > /dev/rdsk/c6t0d0p0
$Note: You need to cat the image to partition 0 (p0) on the raw (rdsk) device.
That's it. You now have a bootable USB stick with just enough on it to perform the BIOS update. Reboot your system, press F8 and select the USB disk from the list of boot options.
Everything should now appear as if you'd booted from the DVD and you can quickly and easily update your BIOS.
Update - 27 Jan 2011: Since Oracle have taken over Sun, locating the "Tools and Drivers" ISO image has become a bit of a challenge. I've removed the link above as it's not valid. You now need to use My Oracle Support under the "Patches & Updates" tab. Select "Product or Family (Advanced Search) and enter the fields as follows:
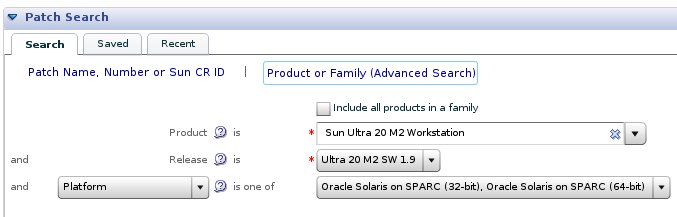
... and click search. This will return one result which is the ISO image.